The editor is a tool, available for computer platforms such as Windows and Linux, that allows you to change several aspects of a game created with Rockbot engine, edit its levels, dialogs, cutscenes, enemies and their behavior and more.
This tutorial will give some small explanations on how to use it giving also a few secrets and tips.
First tip, if you have multiple games inside the games folder, it will witch one you want to load when opening this app.
Game Basics
In this tab you can set some information and details for the game, so let’s give a brief explanation of each field.
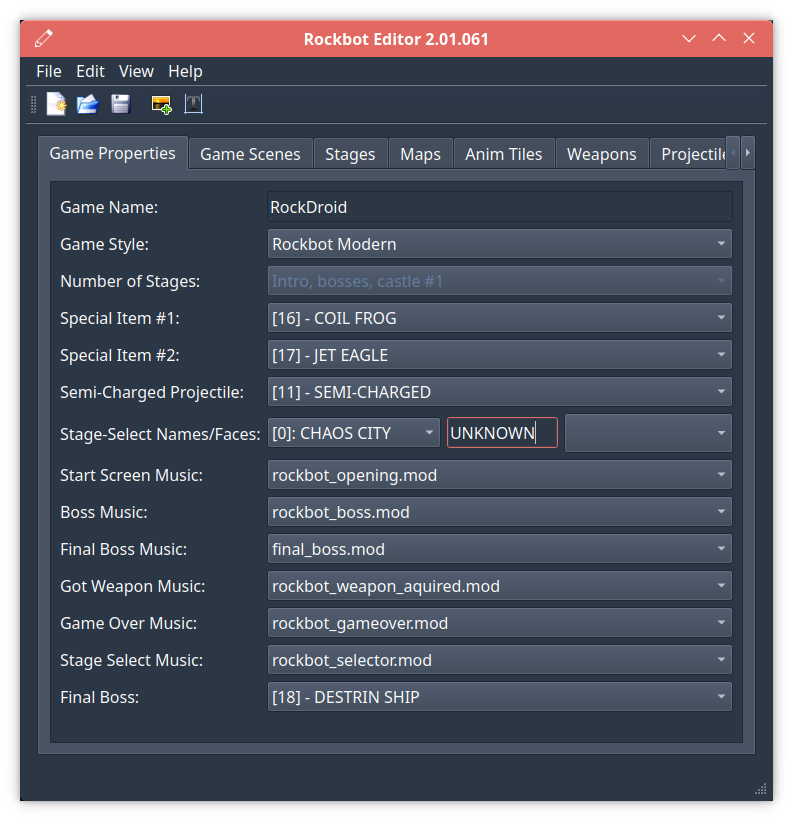
- Name: Just how the game is called.
- Style: Not used right now, but in the future the idea is to expand the engine so it could run also MetroidVania like games.
- Number of Stages: Not used right now.
- Special Item #1 and #2: This will define what is the item the player will gain after beating certain bosses (TODO: give stage numbers). The item must be first be created to appear in this list, so check the Items section in this document.
- Semi-Charged Projectile: For player chamracters that can charge shots, this will determine what is the projectile that will be fired if attack button is released before the shot if fully loaded/charged.
- Names/Faces: This will set the face (from images/faces folder) that is shown in stage selection for each stage.
- Music: All those options are kind of self-explanatory, just set what music will play in each screen.
- Final Boss: Defines witch enemy is the game’s final boss, thus, one he is beaten, the game ending starts.
- Castle Points: Deprecated, will be removed in a future release.
Game Scenes
Here you can just pick witch cutscene, if any, will play in each of those events.

Stages
In this screen you set a number of properties and dialogs for each stage.
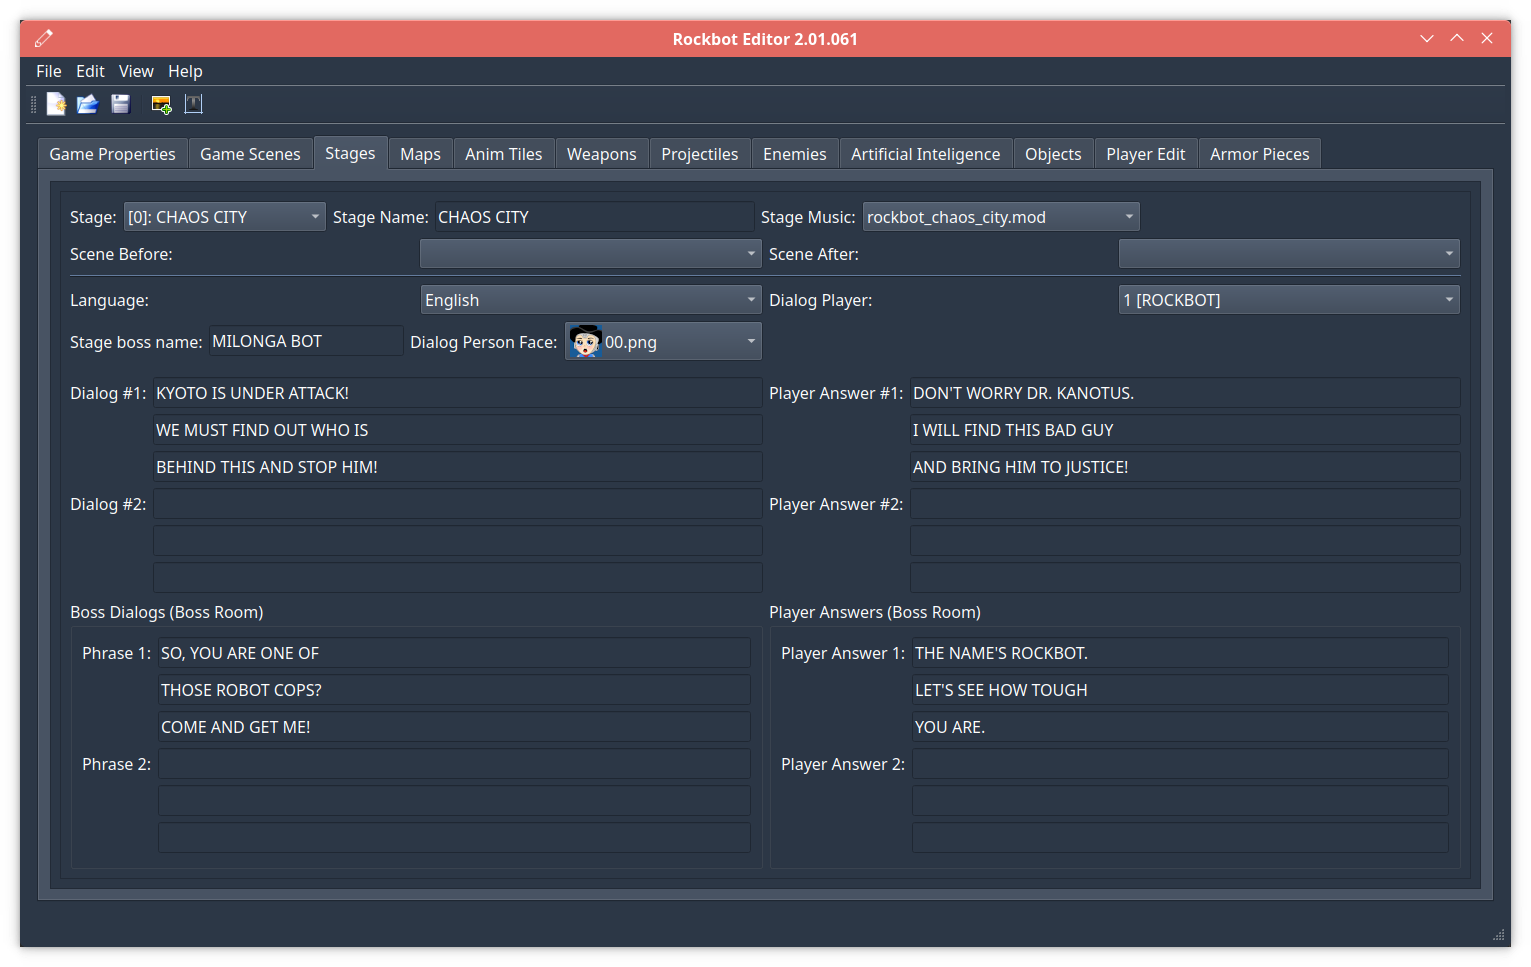
Stage Properties Block:
- Stage: Select the stage you want to edit
- Enabled: Depreacted, will be removed on a newer release
- Stage Name: What will appear in stage-selection
- Music: The background music that plays for this stage (from music folder)
- Scene Before/After: You can set a cutscene no appear before you start the stage or after you beat it.
Dialogs Block:
- Language: The language you want to edit the dialogs for.
- Boss Name: The name of the boss for this stage, will be shown in the stage-select screen.
- Dialog Person Face: The face that will appear speaking with the player on the dialog.
- Dialog and Player Answer are just the order the dialog is presented. First someone (can be the boss or an ally) speaks, than the player character, than the someone and then the player again. But all are optional, leave as empty, and that dialog will not appear. Thos appear when stage starts.
- Dialog Player: Select what is the player character that is replying to the person that starts the conversation.
- Boss dialogs is similar to the previous dialog, but is started when player reaches and enters the boss room.
Maps
Check out the Map Editting section.
Anim Tiles
Here you can create an animated tile that can be used in the map editor. The animation must be repeated by adding frames to the right of the first one.

- Import Pack: Deprecated
- Add Block: Create a new animated tile, it will be placed in the end of the list, with the hightest number plus one.
- Current Block: What is the anim tile you are editting. Each tile is determined by a number.
- Graphic: The file associated, stored in images/tilesets/anim.
- Frame Delay: What the current selected frame will last on screen before changing to the next one. You can change the selected frame by clicking on the grid on the right side.
- Preview; Here you can see the animation of the tile.
Weapons
You can just set properties for the 8 weapons the player will obtain
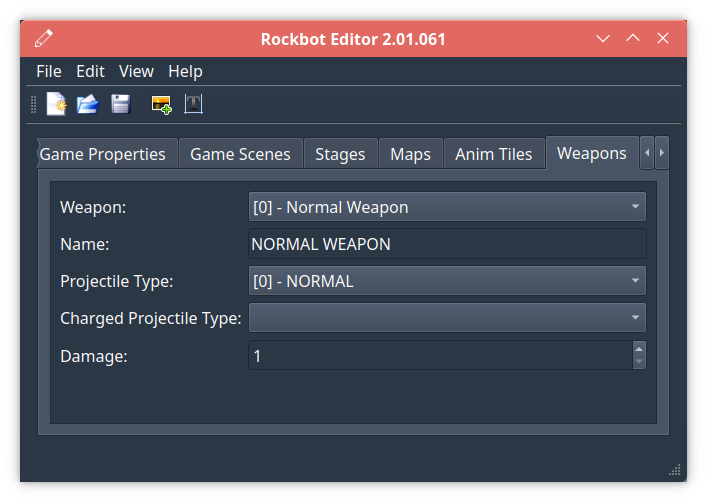
- Weapon: Select witch one you want to edit
- Name: Weapon name as will appear on the weapon selection screen
- Projectile Type: What is fired when player selected this weapon, please refer to Projectiles section.
- Charged Projectile: Currently not used, will allow the player to charge a weapon and fire another more powerful project.
- Damage: What is the damage that weapon will make in a regular enemy without any weakness to it
Projectiles
Here tou create the projectiles both player, weapons and enemies will fire.
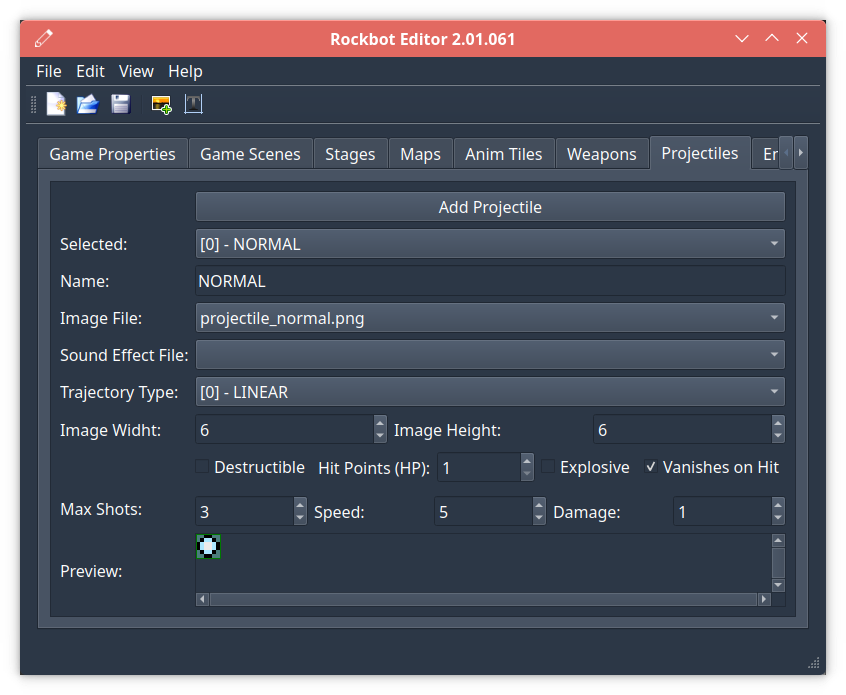
- Add Projectile: Inserts a new one into the list.
- Selector: Pick what is the projectile you are editting.
- Name: The proijectile name, not used inside the game, but useful to pick on weapon/player/enemy properties.
- Sound Effect File: Picks a custom sound (from sfx folder) when this projectile is fired.
- Trajectory Type: This determines the behavior of the projectile after being fired.
- Image Width/Height: Determine the size of the projectile sprite, as same as the animated tile, you can have multiple frames on the right size of the image.
- Destructible/HP: Indicated player could damage the projectile itself to destroy it, currently unused.
- Explosive: Explodes when reaching the target, leaving fire that will damage the area.
- Vanishes on Hit: Once hitting a target it will dissapear, or should continue.
- Max Shots: The limit for simultaneous projectiles of this type on the screen fdired by the player.
- Speed: How many pixels it will move each game cycle (game targets 60-fps currently)
- Damage: How many hit points it will subtract from target. Some effect-only projectiles like wind-push do not make damage, for example.
- Preview: Image of the weapon with all the frames.
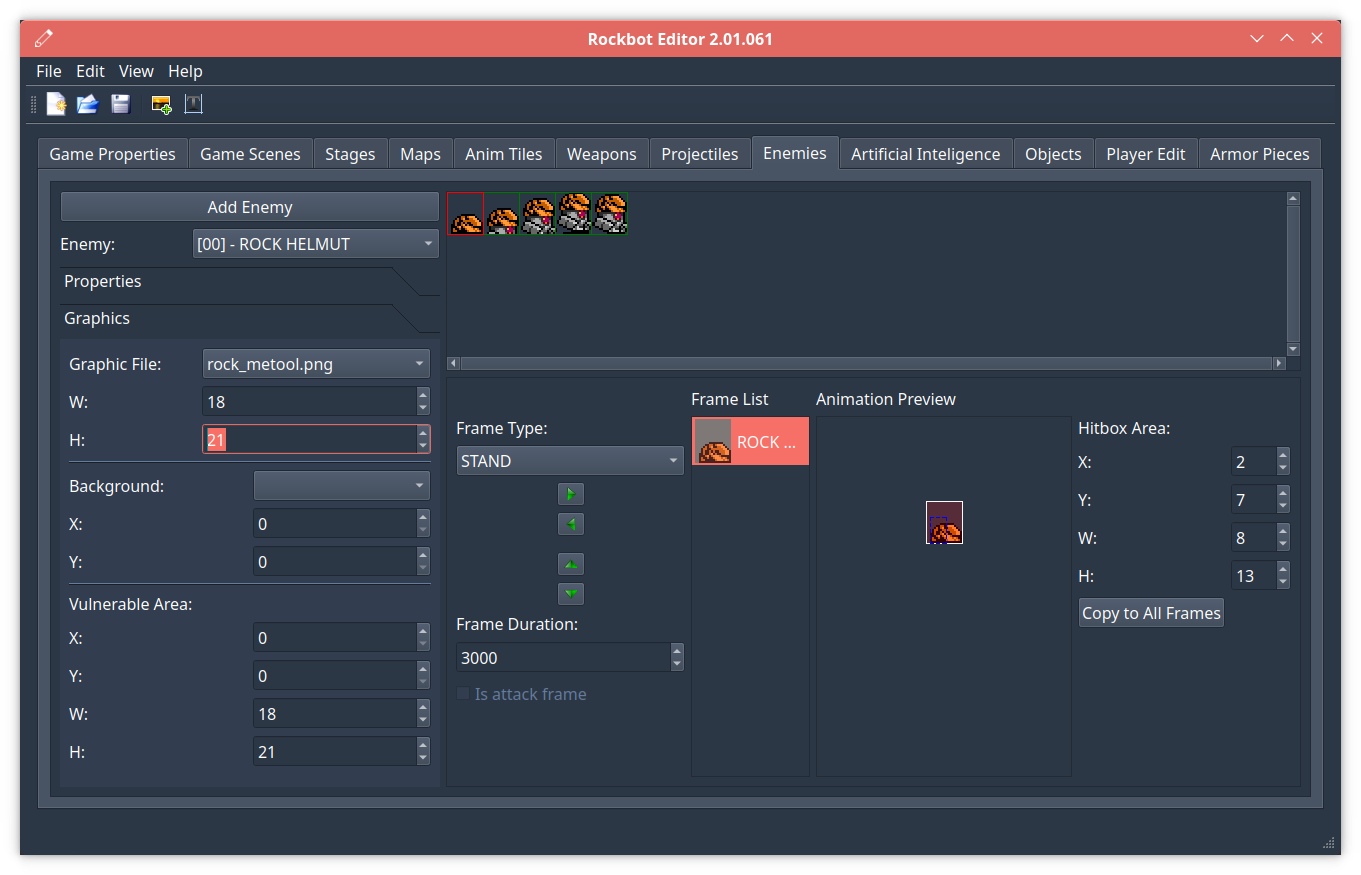
Enemies
On this tab you can edit the enemies properties and graphics.
General
- Add Enemy: Insert a new enemy in the list.
- Enemy: Select the enemy to be edited.
Properties

- Name: The enemy name.
- Hit Points: How many points or damage an enemy can take until it dies
- Projectile Origin: Determine the point the projectile will appear when shot by this enemy, this is shown as the cross between two green dashes lines in preview area, if different than zero. If both X and Y are zero, if will appear in be center of the enemy.
- Is Ghost: Enemy can pass through walls.
- Is Boss: Is a boss, but this does not mean it is the stage boss, that needs to be set on the map edit tool, it just makes him behave a little different when appearning on screen.
- Can Fly: Gravity does not affect this enemy.
- Is Sub-Boss: Is a sub-boss in the stage. The door next to him on the right will only open once he is defeated.
- Shield type: Determine shielding behavior, if any:
- No shield: The enemy does not have any type of protection.
- Full Shield: Enemy reflects projectiles as long as the animation-type is SHIELD.
- Front: Enemy takes no damage if standing or walking and the projectile comes from the front.
- Stand: Enemy takes no damage if standing.
- Disguise: While standing any projectile passed through the enemy.
- Stand Front: Enemy takes no damage if standing and the projectile comes from the front.
- Stand and Walk: Same as Front, just ignore this.
- Move Speed: How many pixels the enemy will move each game cycle (target is 60fps and game resolution is 320×240).
- Range: maximum number of pixels it can move before the AI action is finished.
- Weaknesses: For each weapon, determine a multiplier for damage. If zero, it takes no damage from that weapon.
- Auto-Respawn Delay: Time, in milisseconds, until the enemy reappear. Most of the enemies will only reapear when out of the visible screen, but you can change this behavior in AI edit tool.
Graphics
- File: The graphic file located in images/sprites/enemies, each frame is put side by side, enemy must be facing right on the graphic.
- W/H: Width and Height for each frame.
- Background: Your enemy may be a large one that has no movement on most of its body, so you can use background to set a fixed image for it.
- X/Y: The position of sprites in relation to the background image (0,0 is on left top).
- Vulnerable area: Your enemy might have only a small weak point. Use this to define iot, otherwise it will take all size as vulnerable. If no default, the vulnerable area will appear as a translucent red rectangle in the preview area.
- Frame Type: select the animation type to show the list of frames for it and allow to add/remove frames from the list.
- Left Green Arrow: Insert the select frame from the enemy image above (click each to select, a red rectangle will show what is the current selected) into the list for the given animation type.
- Right Green Arrow: Remove the selected frame from the frame list.
- Up/Down Green Arrows: Move the current selected frame in the list one position up or down in the list.
- Frame Duration: Set how many milisseconds the frame in the list will last until moving animation to the next one.
- Is Attack Frame: Define what is the frame, in an attack-type animation, that will actually insert the projectile on the screen.
- Hitbox Area: This is not the area the enemy takes damage from, but the area it is solid to collide with walls, projectiles and players. One example of use is an anemy that can be in vertical shape in some animation types, but in horizontal for others, so you can set what is its phisical body for each single frame.
- Copy To All Frames: If you want to use the current hitbox value for all frames of all animation types. Useful if you want to “reset” your work.
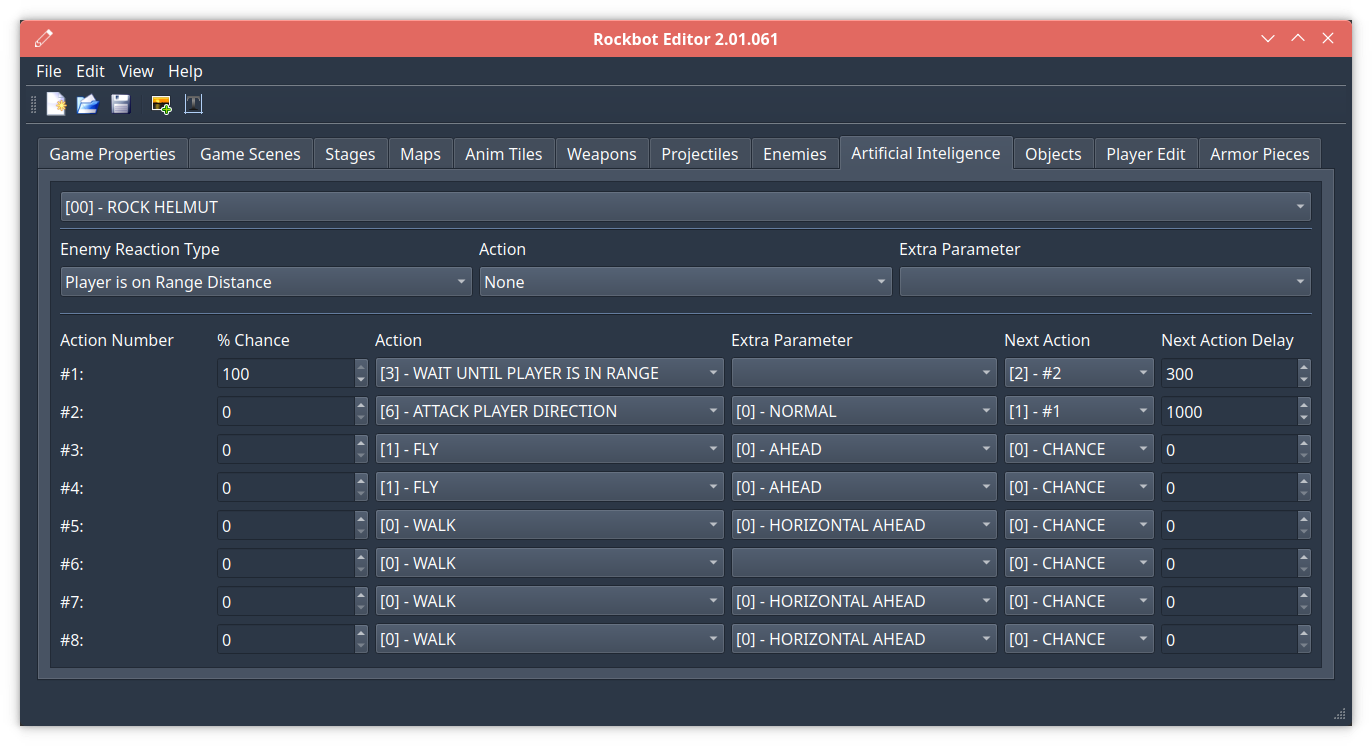
Artificial Intelligence
Here you can determine the behavior for a given enemy. There are two main parts of this AI, the reactions, that is firing some action once an event happens, and the AI cycle, that is the usual run the enemy executes.
Reactions
The reactions event types are as follow:
- Player is in Distance Range: The distance between the player and the enemy is lesser than the value defined in the “range” option in enemy edit tab (check the ennemies section for more details).
- NPC was damaged: When the enemy took damage.
- NPC was killed: execute a post-morten (after-death) action.
- Player is same Y coord: The vertical position of enemy and player are on the height range.
- Player is close: Similar to first option, but cut to one fourth (1/4) of the range value.
- TBD: still not used (any suggestions?)
Actions
The actions are the possible behaviors the enemy can execute and is a long list, going from move ahead to spawn an object or another enemy.
Chances
Actions work using the concept of a state machine. For people who does know what it is, basically every action the machine does is a state, and after finishing that action, it can go to another state depending on the previous one. So, every action that is completed moves to another action. But, to give variety to the behavior, we also have a “chance”. This just generates a number form 1 to 100, and all the actions are given a chance percentage of being the picked one. Right now, the editor does not check the values you input in the Chance field, but you should always limit if to 100%, as using higher values won’t have any effect, anything that is higher than 100 won’t be picked at all. So, let’s say you have 4 behaviors you want to be randomaly picked, you can give each 25% so all of them have the same percentage chance of being picked, or you can give 10% to one, 20% to another, 30% to another and finnally 40% to the last one, so each have more chance to happen than the other.
Next Action
The next part defines the behavior. It is important to understand how it works before. The AI in Rockbot is based upon a state machine, so the idea is that, when an action is finished its execution, the enemy goes into another state, or, in this case, another action; even if the next one is the same as current and you want to create a loop.
So, when, for example, action #1 in the above screenshot, that is walk ahead, finishes its execution by reaching a wall or the enemy’s range limit, it will then, start executing the action #2, that is to make the enemy turn – if facing left, he will then face right and vice-versa; and when the turning is done, it will go to state zero, that is the chance definition. Between each action, you can define a delay, in milisseconds, in the field Next Action Delay.
Possible Actions List
This is a list with a brief explanation on each of the possible actions the enemy can execute:
- Walk: Moves in a given direction following the ground. If there is a hole ahead, the enemy won’t fall, but rather stop this action and move to the next one.
- Fly: Similar to walk, but allows also to move in vertical axis. Warning: make sure the enemy have the “can fly” flag set as enabled.
- Jump: As the name says, execute a jump action.
- Wait until player in in range: Stops moving until distance between the enemy and player is equal or lesser than it’s set range.
- Save Point: Store the enemy position. This can be used by another action later, for example,t o return to that position.
- Attack Ahead: Executes a given attack in the direction the enemy is facing.
- Attack Player Direction: Executes a given attack in the direction the player is.
- Attack Invert Direction: Executes a given attack in the opposite direction the enemy is facing.
- Air Walk: (?) Why not fly?
- Fall to Ground: A flying enemy won’t be affected by gravity, unless you use this action.
- Teleport: Disappears in one place and reappears in another.
- Dash: A fast moving action.
- Grab Wall: Jumps to the wall and grab it, staying on that position.
- Spawn NPC: The enemy will generate another enemy of any type.
- Change Animation Type: Most actions, like walking and attacking, will change the sprites accordingly; but in some cases like a special attack, you want to use another animation type, like jumping for a vertical attack, or show the enemy as tired after a strong attack. This action allow you to just set any animation to the enemy.
- Replace Itself: Spawn a new NPC when dying.
- Circle Player: Keep circulating around player’s position.
- Change Animation Type [Reverse]: As change animation type, but makes the animation frames start from the last going to the first one instead (reverse order).
- Jump Attack [Up]:
- Jump Attack [Ahead]:
- Wait Time [Random]: To give some variety in delay, this will make the enemy stop for the given amount of time (in milisseconds).
- Morph Into: Similar to replace itself, but keeps hit points, position, direction and other properties.
- Play Sound Effect: You can make the enemy talk of shout. You can, for example, use this as a death reaction, so the enemy can speak “bury me with my money” then defeated.
- Wall-Walk: Walk vertically alongside the wall.
- Wall-Walk-Shoot: Walk vertically alongside the wall, shot an attack, then resume walking.
Example
Now that you have the basics, lets take another look on the screenshot. First action has 100% chance, so it will be always be fired first, then it moves until reaching the range limit or a wall, it then turns the enemy to the other side, and again repeats, now moving ahead to the oposite direction it first moved and this repeats forever. This is a simple enemy that moves left, right, left, right…
You can be creative, and if you have ideas for new actions and behaviors, feel free to contact me by email or drop a comment here in the page.
Objects
Here you can create objects that can be used as extra-tools by the player, that are dropped by killed by enemies, generated also by enemies or other stuff.
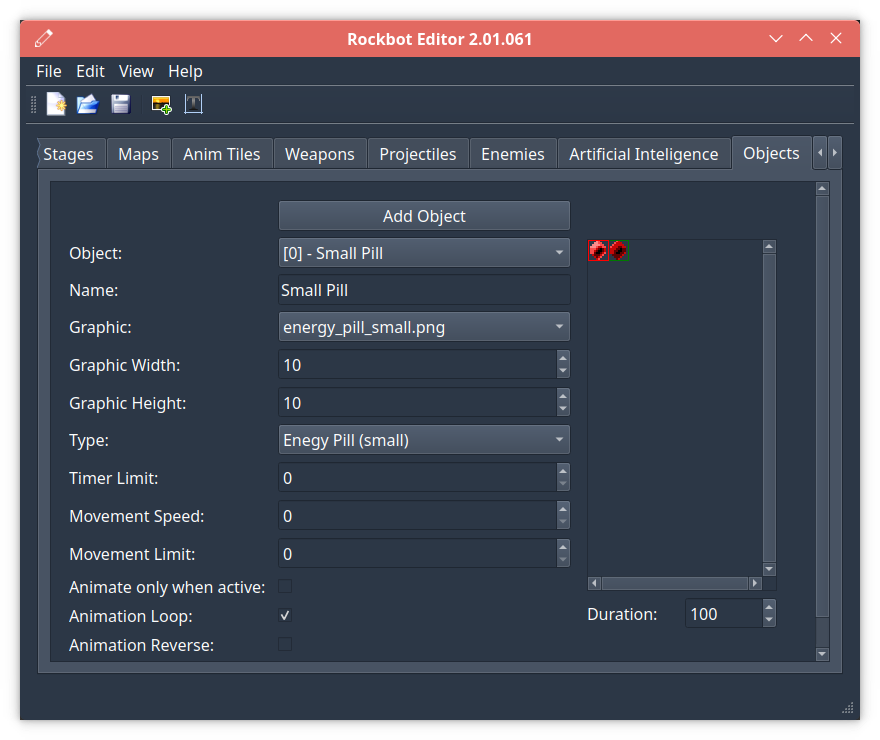
- Add Object: insert a new object into the list.
- Object: current object being edited.
- Name: The name of the object.
- Graphic: file stored in images/sprites/objects.
- Graphic Width/Height: Indicates the size of each frame of the object graphic, all frames must be positioned side by side.
- Type: The object type. This defines the behavior of the object, if is one like a platform, pickable item that refill energy or other.
- Timer Limit: The use of this number depends on object type, for example, a platform is the time it takes for start moving once activated by player stepping over it.
- Movement Speed: How many pixels it moves each game cycle (game target is 60-fps).
- Movement Limit: he use of this number depends on object type, for example, in a platform it indicates home many pixels it will move before inverting direction.
- Animate Only When Active: It remains showing only the first frame of animation until is activated by the player.
- Animation Loop: Once last frame is reached, the animation will restart, if disabled, animation will run just once.
- Animation Reverse: Once last frame of animation is reached, start inverse until reaching the first one again.
- Duration: Determine how many milisseconds each frame will be shown before animation advances to the next one.
Player Edit
ahahaha
Properties:
- Player: What is the player you are editting
- Name: Player name
- Hit Points: Deprecated.
- Has Shield: Can use the shield button to protect against projectiles.
- Max Shots: How many simultaneous shots of the normal weapon it can fire.
- Simultaneous shots: how many projectiles are fired when the player press the attack button (currently max supported is 2).
- Damage modifier: If greater than 1, will increase the damage the player takes when hit.
- Normal Shot: Projectile fire by normal attack.
- Charged Shot: Projectile fired when using charged weapon, set to none to disable charged shot for the player.
- Can Slide/Double-=Jump/Air-Dash/Shot-Diagonal: Enable or disable those abilities for the player.
Graphics:
- Player: Current selected player for edit.
- Graphics: Set the spritesheet for the player from images/sprites folder).
- Face Graphic: Face of this player shown in dialogs and stage selection, from images/faces folder.
- Sprite Size: The size for each of the player’s sprites.
- Colors: For each weapon you can set the 3 colors that will be presented in the sprites when player changes to that weapon. The spritesheet needs to use 3 color-keys for this to work: #ff00ff, #37ff00 and #00ffff. Clicking each “color N” button will open a color-pick dialog that have a pre-determined list. (It will be changed to a dialog that will allows to pick any color in a newer version).
Armor Pieces
Determine, for each player, the ability gained when that armor piece is aquired.
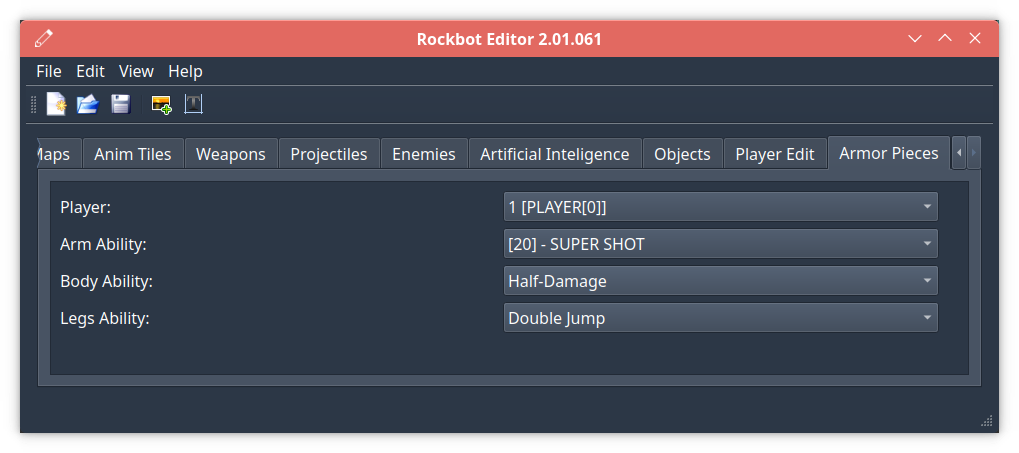
- Player: The player character that you are editting.
- Abilities: For each part, determine the special ability that will be gained. The list is pre-determined as this is defined in the game’s engine code.
MOVIE EDITOR
The movie editor allows you to create cutscenes to run in the game. Each cutscene, called scene, is composed of any number of smaller pieces that are executed in order.
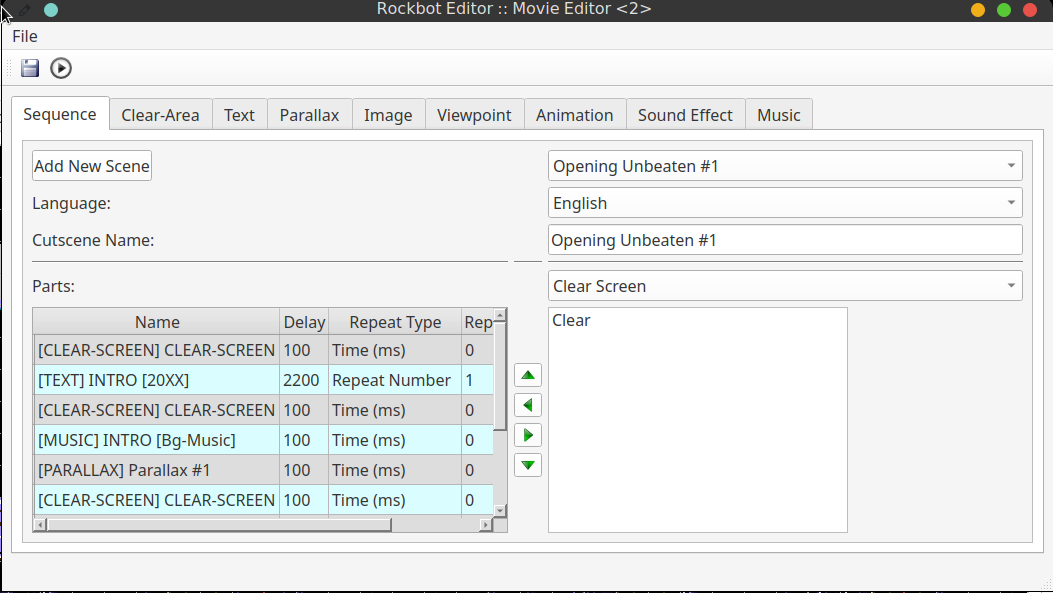
In the Sequence tab, you can create a cutscene and organize the sequence of steps and delay between each. Because Rockbot engine is multi-language, you may need to change the language to play it in the language you want to see.
In the “parts” selector, pick the type of the one you want to add and click the left arrow button to insert into in the sequence. Note that for most action types, you need to first create them in the other tabs of the movie editor window, but a few ones like crear screen are statis and always available. Once you added it, you can click into one of the itens in the table in the left, then use the up and down green arrows to change the order this part will be played inside the cutscene, or you can click the right green arrow to remove the part from the cutscene.
You can also double click an entry in the left table to edit a few properties on it.
- Delay is the time it takes after this part is finished to move to the next one.
- Repeat Type: The way it will count repeat (see next item).
- Repeat value: In case you want that the part repeats before going to the next one, you can set a value here. If you used time (ms) as repeat type, it will repeat until the totoal time of it executing it equal or greater then this (in milisseconds), but if you want to it to repeat for a given number of times, use repeat number and set the value on this field as desired.
- Async: This is not supported yet. The idea as that more than one part can execute at same time.
Clear Area
This allows you to fill a given are in the screen with a solid color. The field values are the rectangle coordinates and size on the screen – remember the game run on 320×240 resolution.
Text
Show a text on the screen. You can change the text depending on the language and set the position and style it will be presented on screen.
Parallax
Here you can create a scene part that can move up to 10 image layers in different positions and speeds each one.
Image
Shows a image or part of it in a given position of the screen. This can also be used to move the image from a point to another by initial and dest fields, if different.
Viewpoint
While in the image you can create an animation by changing the initial and final positions of the image, in this tab you can change the initial and final area of the image you show in the screen. Similar to parallax, but for a simple image and you can move the viewport in any direction.
Animation
In this case, you can use a image that have multiple frames, side by side, and it will show each frame. The way you define the frames is telling the editor the width, so for example, if you have an image with totoal width of 300 and 3 frames, each frame is 100 pixel wide and this is the value you set in the editor.
Sound Effect
Play a given sound effect, does not interfere with any playing music or other sound effect.
- Total duration: the amount of time this part will play until ending.
- Frame Delay: time, in milisseconds, each frame will be on screen before moving to the next one. Usually you don’t need to change this value as speed for each layer does the job, but can be used as fine-tunning for movement speed.
- Direction: sets if the imagesr moves left, right, up or down.
- Layer: select the current image layer you are setting values to.
- Adjust Y Position: how many pixels image is positioned from top of the screen.
- Max Height: If different than zero, sets the max height for the given layer.
- Speed: How many pixels the layer will move each frame.
Music
Play a given music, stop any that is already playing.